Beauty Tips

Beauty Tips Pimple, Acne, Scars, Finelines, Dark Circle, Freckles, Open Pores, Elbows, Knees, Nail, Fair Color, Skin Glowing, Blackhead, Whitehead, Dandruff, Hair Fall,

Skin care, Wax, Facials, Skin Polish, Skin tips,

Oily Skin Care, Dry Skin care, Normal Skin Care, Sensitive Skin Care, Combination Skin Care, Face Whitening, Facials, Skin polishes type, Hot Wax, Normal Wax,Face Mask,Manicure, Pedicure,

Hair Care

Hair design Tutorial,Hair Mask, Hair tips,Hair Styles, Hair Colors, Hair Extensions, Hair Cut, Hair Trends, Hair Color Chart, Updo Styles, Hair Buns, Hair Tails, Hair Straightener, Hair Spray, Hair Roller, Hair Rebonding, Hair Regrowth, Ribbons, Hair Fashion, Hair Tutorails, Hair types, Hair Texture, Hair Tattoo, Hair Tumblr, Hair Twist, Hair Ties

Makeup

Makeup Ideas, Makeup Tips, Bridal Makeup, Party Makeup, Day and Night Makeup, shimmer makeup, Makeup Tutorials, Makeup Tumblr, Makeup Trends, Makeup Tattoo, Makeup Types, Makeup Steps, Makeup Sets, Makeup Brands, Makeup Application

Health

All about health and fitness.

Thursday, September 30, 2010

how to do deep cleansing step by step


You can do very well at home.

If you want that you look better then you should care of yourself, here are some step by step instructions. Do it once in a month for deeper cleansing and you will see improvements in your skin tone. It will make a difference to your complexion.

There are basic 6 steps. Before beginning, you must remove your make-up.

CLEANSE
Use a non-lathering cleanser.

  • Apply the cleansing cream or cleanser over your face.
  • Massage in circular and soft handed movements over the face and neck.
  • Leave it on face for a few minutes to dissolve dirt, grime, stale make-up and oils.
  • Wipe off with cotton pads. Do not apply the sensitive skin around the eyes.
  • Rinse off with lukewarm water.

STEAM
Steaming hydrates and softens the skin. It will help to soften the plugs that cause whiteheads and blackheads.

After steaming, the whiteheads and blackheads can be more easily removed with a mask and you will look good.

Use the following steps to do steaming at home.

  • Drape a towel over your head.
  • Fill a sink or wash basin with hot boiling water.
  • Lean over the top of the basin (about 20 cm away) to capture the steam.
  • Do this for 5 - 10 minutes.
  • Pat the face dry with a clean tissue or soft towel.
  • Cover your fingers with tissue paper before removing any blackheads, gently.

Do you have broken veins or sensitive skin? Skip this step.

Electric facial steamers can also be used.

EXFOLIATE
Scrubs contain abrasives in a cream or detergent base. They will scrub away accumulated dead cells that make the skin appear dull and lusterless. This will leave your face softer and smoother.

Facial scrubs for acne or oily skins are usually formulated in a detergent base.

Those for dry skin are formulated in a creamy base with some added oils.

  • Use warm water to make your face damp.
  • Massage the face gently with a blob of scrub using your fingertips. Do this in circular motions for about 1 – 2 minutes. Avoid the eye area where the skin is delicate.
  • Rinse with warm water.

Skip this step if you have broken veins.

FACIAL MASK
Do you have oily skin? Choose a clay-based mask.

Do you have a normal or dry skin? Choose a moisturizing one.

  • Smooth on a facial mask.
  • Leave the mask on for about 15 – 30 minutes. Check the instructions specified on the product. You should follow the length of time as given.
  • Lie down after applying the mask and relax. You can apply cool eye pads if you like.
  • Use warm water to rinse away the mask.
  • To finish, splash some cool water. This will help to close the skin’s pores and refresh the face.
  • Use a soft towel to pat the skin dry.

TONE
Do you have dry skin? Choose a mild alcohol-free toner.

  • Pour some facial toner onto a cotton pad.
  • Smooth over the skin. Pay attention to oily areas, in particular the T-zone on the forehead, chin and nose.
MOISTURIZE
  • Dot some moisturizers on your skin.
  • Smooth it over the skin.
  • Massage slowly with circular movements your skin. This will boost blood circulation resulting in a brighter complexion and reducing puffiness.
  • Apply a small amount of eye cream around the eyes.
  • Gently pat it in with your ring finger. The tapping action helps relieve puffy eyelids and also stimulates the acupressure points around the eyes.

Simple Facial


Step By Step Guide To Home Facial

  • Pull your hair back from your face and cover it with a scarf. Cover your clothes with a dressing gown.
  • Start by thoroughly cleansing your face. Make sure that all the cleanser is removed with tissue especially in the creases at the sides of the nose and centre of the chin.
  • The next step is to massage your face. Make sure your hands are clean before you start the massage. During a massage routine, blood circulation accelerates the deposits of lactic acid and get washed out of the muscles. Give yourself a massage about five to ten minutes.
  • Begin the massage by placing the pads of both thumbs firmly between the eye-brows. Using firm and even pressure slide them slowly down either side of the nose moving out from its base over the cheeks to the jaw bones.
  • Now dab a soothing cream on your skin and rub it evenly over the face. Starting at the base of the throat work upward, using the backs of the hands, to the point of the chin. The sides and the back of the neck should be massaged with the fingertips using upward circular movements.
  • When a movement is finished return to the starting point. Starting at the centre of the upper lip, use circular movements out as far as the cheekbones. Working from the centre of the upper lip, use circular movements out towards the centre of the cheeks.
  • The skin under the eyes should be gently patted with fingertips, and not massaged. Begin from the nose working under the eyebrows with the fingertips using tiny circular movements, around the eyes to the underneath, and then pat the skin very gently working towards the nose. The forehead should be lightly stroked with the fingertips in any upward direction. Then, working from in-between the brows, employ small circular movements out, and over the eyebrows.
  • To complete the massage, using the second and third fingers, pat over the face lightly. This is excellent for muscles which tend to sage.
  • After about ten minutes wipe off any surplus creams with a paper tissue.
  • The last step is to apply a face pack. To make a face pack yourself mix about one tablespoon of Fuller’s earth with a skin tonic or an astringent. The purpose of applying a face pack is to draw out impurities to close the pores and remove any rough scaly surface on the skin and tighten the facial muscles. Using the pads of your fingertips spread the pack gently over the face. Use the palms of your hands to spread the pack over your neck. When you are using a face pack it is better to cover your eyes with cotton wool pads squeezed out in cold water or preferably rose water. If you have an oily skin, leave the mask on for about ten minutes. For dry and combination skins, leave the mask on for about five minutes. If your skin feels tight and uncomfortable, do not wait for the recommended time, and remove the pack immediately.
  • Remove the mask with warm water and cotton wool. After that dab on some skin tonic if you have combination or dry skin and astringent if your skin is oily. Do not apply make-up immediately after your facial.

How to do at home facials!

Monday, September 27, 2010

How to Do a Simple Cleanse


Cleansing the body is so important. We may clean our houses every week or every other week, but we forget about our bodies. They can detox themselves, but over time we develop more and more toxins from the environment. If we don't eat organic, then we get all of the toxins from the pesticides and fertilizers from our fruits and vegetables. We also get hormones and antibiotics from the meat that we eat. So very important to eat organic fruits and vegetables and grass fed meats. You can get these foods cheaper through your local farmer.
Here is a simple cleanse you can do first thing in the morning. This will help detoxify your liver and lymphatic system. It also aids in digestion and absorption of fats.


Instructions


  1. Measure 2 tbsp of olive oil and put in a glass.

  2. Take the fresh half lemon and sqeeze it into the glass.

  3. Stir and enjoy.


Massage


Step 1: Make yourself comfortableYou can do this massage in any setting, but it is more effective when the mind is calm and the body is relaxed. Find a quiet place if possible, either lying down or seated. Take a few deep breathes and if you wear glasses, remove them before starting. ________________________________________

Step 2: Head tapping - Firstly, start by gently tapping the head by drumming your fingertips all around the top of the scalp. This stimulates blood flow and brain cell activity. Carry on doing this for about 1 minute. ________________________________________

Step 3: Forward swipes - Next flatten both hands with your palms facing you and hold them at forehead level. Turn your head from left to right, alternate swiping the forehead with the fingers of the left and right hand. It should be your head that is moving and not your hands. Repeat this about 10 times to each side.

________________________________________

Step 4: Circle the eyes - With the hands still at eye level, now make loose fists while placing the thumbs on the cheekbones. Starting at the bridge of the nose, firmly draw the knuckles of the index fingers in an arc across the eyebrows and down the outside of the eye.

Then once again starting from the bridge of the nose, this time draw the knuckles in an arc beneath the eyes on the crest of the cheekbones. Repeat this cycle approximately 10 times.

________________________________________

Step 5: Palming the cheeks - Once again open the hands and place the palms over the cheekbones.

Firmly draw the palms down towards the mouth, then continue along the bottom edge of the jawbone. Follow the line of the jaw upwards, to just in front of the ears, then in along the cheekbones completing a cycle. Repeat this cycle 10 times.
________________________________________

Step 6: Mouth swipes - Now turn the hands with fingertips pointing towards each other and the palms towards you as in the forehead swipes, but this time at mouth level.

Again, move the head side to side, swiping the mouth and lips with your fingertips. Remember it is the head that turns while the hands remain still. Repeat 10 times to each side ________________________________________

Step 7: Throat pull - Lowering the hands to neck level, we will now extend the thumbs and curve the fingers slightly.

Using very light pressure place one hand on the throat, and pull directly forward while closing the thumb and forefinger so that you tug gently at the skin as your hand slides off. This should not be painful or uncomfortable.

As the first hand slides off, the other hand is rising to repeat the process. With practice, you can achieve a steady rhythm. Repeat with both hands 10 times. ________________________________________

Step 8: Ear massage - To begin, we are going to make "Spock" hands, that is, with your little finger and ring finger together and middle and index finger together.

Place the hands on the side of the head with the ears between the fingers and massage up and down. Repeat this 10 times.

Now we will massage the ears. Starting at the tops, rub the ear firmly between thumb and the first two fingers. Continue down to the lobe covering the entire ear. To finish give the earlobe a firm tug, then the middle of the ear, and finally the top.

Repeat this 3 times.

how to do massage on face step by step

Face And Head Massage:

The Face Massage and Head Massage is a particularly pleasurable experience- most people will be surprised at the amount of tension they hold here, particularly around the jaw.There is not usually time for a full face and head massage as part of a full-body massage.You might like to try it on its own or in combination with a back and shoulder massage.

imageFace:

Massage Steps:
1.Cup hands around the head, with thumbs resting on the forehead and fingertips at the temples.Smooth out the forehead in strips-starting along the eyebrows, working up toward the hairline.
2.Press between the eyebrows with your thumbs.Repeat, moving up the center of the forehead to the hairline.
3.Massage temples, using circular motion with fingers.Continue circles down along the jawbone to the chin.
4.Using your fingertips, draw a line under the cheekbone and out to the temples.Repeat, taking the line lower down the cheek each time.
5.Use the fingertips to draw a big moustache shape from the upper lip out to the temples, and circle the temples one more time.
6.Press softly around the upper bone of the eye sockets, starting from the bridge of the nose, out to the corner of the eye.Repeat, this time working carefully around the eye socket under the eyes.
7.Gently massage the ears between your thumbs and fingers, starting at the earlobe and moving around and up to the top of the ear.
8.Pull ears very gently, again starting with the lobe and moving gradually to the top of the ear.
9.Cup hands and rest them over the eyes(it's best to warn your partner before you do this).Ask your partner to breathe in and out deeply several times.Release the hands.

Massage Don'ts:

The throat is another vulnerable area of the body.Although the sides and back of the neck can be massaged, avoid working directly across the throat itself.
The face is naturally more oily than the other parts of the body.Unless the reciever has particularly dry skin, you will not need to add extra oil at this stage.

imageHead:
Massage Steps:

1.Cup forehead in hands once more and press in the middle of the forehead at hairline.Continue pressing upward to the crown of the head.
2.Supporting the head in the hands and with fingers at the base of the skull, massage the entire scalp.
3.Draw fingers lightly through the hair several times, and off at the crown.

Massage Tips:

If your partners hair is very thick, avoid the possibility of getting your fingers caught in tangles by drawing your fingers over the top of the hair instead.

Sunday, September 26, 2010

manicure and pedicure


Manicures and pedicures are a great entry point into Beauty Therapy.

This course is an excellent addition to the artificial nail course or a very substantial stand alone course.

Not everybody is interested in doing artificial nails, but learning manicure and pedicure procedures or adding them to your existing skills will greatly enhance your business.

Both manicures and pedicures are very easy to learn and the beauty of these services is that they use very little product, so once you are set up it is almost pure profit.

  • 1

    First Mix a little olive oil and Sea Salt together and rub it all over your hands. Make sure to also rub it into your cuticles good. Then Rinse with warm water and towel off hands. Rub your Nail beds real good to get off any oil.

  • 2

    File your nails in the shape you like be careful to only run the file in one direction. Then Buff your nail beds but be careful not to buff to long or you will wear the nail thin. You just want enough to take the oil off the tops and give the nail a little shine.

  • 3

    Next you want to push back any excess cuticles with a cuticle pusher.

  • 4

    Now you want to polish your nail. Make sure not to have to much polish on the brush. Place the brush in the center of your nail run it down the middle of your nail covering the majority of your nail then go down each side to completely cover your nail. Also run the brush over the tip of your nail from left to right. Give the polish a few minutes to dry and repeat if needed. Sometimes less is better and lasts longer!!

  • 5

    Last apply top clear coat the same way. Run the brush in the middle and then down each side. Then run it from left to right on the tip and end of your nail.


  • To perform a pedicure you will need all of the same files, implements and tools required to perform a manicure except you will want to replace the finger bowl with the foot bath. If you are performing this procedure on yourself, place a large folded terry towel on the floor in front of you upon which you will set the foot bath after it has been filled part-way with water. Add a few drops of liquid soap or nail scrub, essential oils or your favorite foot bath/salts to the water and allow it to disperse.

    Place all your implements, files and supplies on a terry towel within easy reach. You will be following the same type of procedures as with a manicure, although the files you will use will be a different grit as the toenails are generally thicker than the fingernails and require a grit of about 180 to remove length. You will also need to use your toenail nippers. You may also wish to spray or wipe your feet with an antiseptic spray prior to starting your pedicure, and be sure to thoroughly wash your hands.

    You may also choose to use some of the same 'optional' products with your pedicure that you used with your manicure.

    • Remove old polish from the nails of both feet.

    • File toenails straight across, rounding them slightly at the corners to conform to the shape of the toe. Use the toenail nippers to remove the underside of the corners so they will not 'dig' into your flesh. Use a 240-grit file to smooth the underside of the corners and to bevel the free edge.

    • Place one or both feet into the foot bath, and flip on the massage button if your machine is equipped with the massage feature. Allow your feet to soak for a full 5 minutes.

    • Apply cuticle remover if you wish and massage it into the cuticle.

    • Use your orangewood stick or the metal cuticle pusher to push back the transparent cuticle and to clean under the free edge. Never 'dig' into the flesh as breaking the seal between the nail plate and the nail bed will allow bacterial organisms to enter and an infection could occur. Do not use excessive pressure to push back the cuticles as this action could damage the matrix.

    • If loose cuticle skin is apparent, you may remove it by nipping with the cuticle nippers, being careful not to cut live tissue.

    • Repeat steps 2 - 6 on the other foot.

    • Scrub your feet and toenails with the nail brush being sure to cleanse the lateral nail fold and underneath the free edge.

    • If you have a build up of calloused skin, it can be filed with an 80-grit foot file paddle. Never attempt to use a credo blade to cut or remove calloused skin as it is much too easy to remove healthy skin along with the callous. Do not attempt to remove all of the calloused skin in one session. Depending on the depth of the callous, it can take several months or more for the healthy skin to show.

    • Massage both feet by applying lotion, cream or oil to the palms of your hands and then to your feet. Massage your feet, lower legs and toes, then put both feet back into the foot bath and scrub the toes to remove all traces of oil or lotion. To remove the suds or bath salts, use a spray bottle filled with warm water to rinse the toes, then dry your feet, legs and toes and between the toes with a soft towel.

    • Wipe each toenail with a cotton or gauze pad saturated with remover or alcohol to be sure the nail plate is free of oils.

    • Apply basecoat, two coats of color and a thin topcoat. Be sure to allow a minimum of 1 minute between coatings for each coat of enamel to dry.

    • If you are afraid of smudging the polish, you may wish to use toe separators between your toes. Leave them in place until the enamel has completely dried.

    • Empty the foot bath, clean it with a disinfecting solution and dry the tub. Clean all your implements with the same solution, allowing them to soak in the solution for a full 10 minutes. Remove from the solution, rinse, dry and place in a sealed container for the next use.

    Wax


    Waxing is a very easy and effective method of hair removal, and weather done in a salon or in the comfort of your own home the results can be the same. I have never gotten along with waxing strips, so I tend to go with warm wax, although there are microwaveable options, the best and safest thing to do is to purchase a professional wax heater, it is a very worthy investment.

    The following are steps to achieve the best possible waxing treatment in your home. Always start at the bottom of the area you are going to wax and move up to avoid as much irritation as possible. For the purpose of this article, I will use a half leg wax as my example. The hairs need to be at least 5mm long for waxing to be effective.


    Waxing is a very easy and effective method of hair removal, and weather done in a salon or in the comfort of your own home the results can be the same. I have never gotten along with waxing strips, so I tend to go with warm wax, although there are microwaveable options, the best and safest thing to do is to purchase a professional wax heater, it is a very worthy investment.

    1.
    Make sure the area is clean and oil free before you start. Oily areas will stop the wax from sticking to the hairs, and so they wont be pulled out. If it is particularly warm then rub a small amount of talcum powder into the area.

    2.
    Once the wax has heated to the correct consistency(about the texture of runny honey) dip the waxing stick into the wax, take the excess off the back of the stick and remove the wax from the tip.

    3.
    Start about 4-5 inches from the foot and work towards the ankle(dependent on direction of growth). With a sweeping motion, making sure that the stick is kept at a 45degree angle, pull the stick in the direction of the hair growth and remove the stick.

    4.
    Take a waxing strip and firmly adhere to the wax, leaving enough for you to hold. Stretch the skin(pulling towards the foot) with on hand and pull back the strip in one quick motion.

    5.
    Repeat the process working methodically over the the leg area being careful not to go over the same area too many times. Remove any stray hairs with a good pair of tweezers as required.

    6.
    Once both legs are finished, gently apply a cooling gel, such as Aloe vera to the area. Don't have any heat treatments(sunbathe, sauna, shower, etc...) for at least 24hours, and also avoid tight fitting clothes.

    You should now have smooth hair free legs, remember to ex-foliate the skin regularly and wait at least four weeks before your next treatment, to enable the hairs to grow long enough for the best results.


    Threading


    One of the best methods of upperlip hair removal is threading. Threading removes the tiniest and finest hair right from the root. Here�s how you can thread at home.

    Getting rid of hair on the upperlip is extremely annoying. If you get it waxed, you need for it to grow a certain length before you can wax it again. If you get it threaded at the parlour, you wait until there is a slight green shadow before visiting the parlour again. Bleach isn�t very good for the skin and it leaves the hair lighter but not completely invisible. And hair removal cream doesn�t remove the hair from the root, causing hair to grow back thicker.

    The best method of hair removal from the upperlip is threading. You don�t have to wait for hair to grow a certain length � threading removes the tiniest and finest hair right from the root. Tweezing does the same as well, but tweezing is more painful, more time consuming, and tends to leave in-growths.

    If you have easy access to a parlour just across your home which charges Rs. 5 for upperlip threading, you can skip this article. But if not, here�s how you can remove upperlip hair at home, easily and quickly.

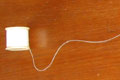
    Take around 2 feet (24 inches) of thread length. Make sure you use a good quality, strong thread. There is no special thread for threading, you can use any thread as long as it is strong and doesn�t snap easily.


    Take both ends and knot them up. You need to have a circle of thread. Although beauticians normally use thread straight from the reel keeping one end in their mouth and holding the other end, you don�t need to get so technical � especially because you will not be able to thread your own upperlip in this manner.


    Now hold the thread with both hands, and wind it around ten times. The wound bit now lies in the center of the circle.


    Now, place the thread around the fingers of both hands. Push the wound portion towards one hand by widening the fingers of one hand and simultaneously closing the fingers of the other hand.


    Similarly, by opening the fingers of the closed hand and closing the fingers of the other hand, push the wound portion in the other direction.


    Keep practicing pushing the wound portion back and forth. Once you are able to push back and forth easily, you can move on to the other step � practicing on a body part.


    It is best to practice threading on your leg. Most people have a lot of hair on their legs and their legs are easily reachable. They don�t have to strain too much to look for hair or to reach it, and they don�t have to look in a mirror.


    Sitting on your bed or on a chair, prop up one leg and identify the portion from which you want to remove hair. Place the thread on this portion. Let the wound part be one end of the hair, and the thread from the other side should be on both sides of the hair you want to remove. Now, move the wound portion to the other side, making sure that it catches the hair while moving. It will then lift the hair from the root as it moves back and forth.

    You will need practice before you can manage. And if you know how to thread your upperlip yourself, you can run thread through it for a couple of minutes every other day so your upperlip is always completely free from hair. No more waiting for the hair to grow back before your next threading or waxing session at the parlour.

    How prepare skin for makeup


    Many Western women do not wear make-up or simply use a quick application of mascara and lip gloss. Why?

    The answer of the majority of women is "because I don't know what to do". Very few might say that they look great without make-up.

    Are you really sure? Imagine your favourite, adorable model or celebrity. Even the most gorgeous looking leading ladies always wear make-up to look great. You will never see them without make-up on the red carpet. You too can look great by wearing the right make-up.

    To achieve great results from make-up, it is vitally important to prepare your skin properly. Without preparation, you cannot expect it to look good with only "cheaty" make-up.

    Skip this process and you will never achieve good results, no matter how much you struggle with expensive foundation and concealer.

    Spend an extra five minutes in the morning and ten minutes before bedtime.

    1) Wash your face

    Always wash your face with fresh, running, lukewarm water. Take off your make-up with wipes, but don't stop there. Although you cannot see it with bare eyes, your skin pores gradually build up dirt and collect the remains of make-up. Over time, this will cause skin problems.

    2) Choose your face wash carefully

    Dry skin, oily skin or combination skin? Don't just grab anything from your mother's or flatmate's cabinet.

    Test your skin by stroking it with your fingers. If it feels a bit rough and bumpy, apricot scrub could be a great solution.

    3) Use toner

    After rinsing off your face with clean water, give a generous splash of toner. Gently tap your skin with the palms of your hands (no slapping).

    Your skin needs both, fluid and moisture, no matter which season. Use toner and moisturiser to balance your skin into good condition.

    4) Use the right amount of moisturiser

    Put just the right amount of moisturiser onto the palms of your hands, smear it all over by rubbing both hands against each other, then cover your face with your hands. This will allow you to spread the moisturiser evenly.

    Use your finger tips around the eyes and nose. Dub delicately.

    Feel to check if your skin is absorbing the moisturiser: If your skin still feels greasy after 5 minutes, you are putting on too much. If your skin feels dry or pulls, you are not using enough moisturiser.

    If you have spots or sensitive skin, don't be afraid to touch your face. Your skin needs help, not neglect. You might think the less you touch the better, but this does not mean that you cannot do anything about problem areas.

    If a huge, ripe spot is staring at you, my advice is to pop it. Then immediately apply disinfectant spot formula (available at your chemist's).

    Make-up cannot hide something sticking out of your skin (in pictures, you will see the unpleasant shadows of spots), but you can hide flat, "used-to-be-spot" areas with concealer.

    Sensitive skin needs more attention. The right balance of toning and moisturising often solves the problem. The process is the same, but be sure to use products for sensitive skin.

    People with oily skin are often tempted to forget about their moisturiser, which is a big mistake. The skin is designed to produce grease to keep it moist - nature's work. The more you neglect your oily skin, the more greasy it will get, creating a breeding ground for other problems such as spots, open pores and blackheads.

    Your skin always needs tender, loving care - every day and throughout the year, not just during the cold months.

    Friday, September 24, 2010

    Messy Bun


    Method 1

    1. Start by washing your hair or just rinsing it.
    2. Then Brush your hair back, leaving you without a part.
    3. Take small sections of hair and "scrunch" (with gel) sections up to desired height of bun.
    4. Secure with a hair tie and add some mousse.
    5. Make the bun look loose with hair spray and gel.
    6. Tousle with fingers to make more of a messy look.


    Method 2

    1. Make sure your hair is brushed, but if there are some knots, let them be.
    2. Flip your head upside down and gather up all your hair.
    3. Tie it tight into a big bun with a ponytail holder ontop of your head.
    4. Now you have a cute bun!

    Method 3

    1. Put hair in a medium or low ponytail.
    2. Put your head down and put it so your hair falls into a circle around the ponytail holder.
    3. Grab the part right around the ponytail holder and wrap another one around it.
    4. Take some of the leftover pieces of hair and twist them and tuck them into the ponytail holder.

    Scrunched Hair


    Method 1

    1. Take a shower or make sure your hair is wet.
    2. Comb through your hair and make sure that is thoroughly combed.
    3. Towel dry your hair, but not completely. Your hair still needs to be damp.
    4. Take some gel or mousse ,use more if you have thick hair,and scrunch your hair in your hand while blow drying to solidify.

    Method 2

    1. Take a shower or drench hair.
    2. Comb through hair.
    3. Towel-dry your hair, but make sure your hair is still damp.
    4. Put hair half up and straighten the bottom.
    5. Once bottom is straighten put the rest down and follow the rest of the steps in method one to scrunch.
    6. If you have bangs, do not straighten them! It looks cute!.
    7. You're ready to go!

    Method 3

    1. If your hair is curly you probably want to straighten it.
    2. Flip your head upside down.
    3. Take some strong hold mousse (about a hand full) and work it through your hair upwards toward your scalp.
    4. Now keep your head down and take some strong hold gel (about the same) and work it through your hair upwards toward your scalp.
    5. Keep doing that for about 2-3 minutes then flip your head up.
    6. then scrunch towards the top of your head until it is as you like. (you may also want to add a poof in the front. just secure with bobbie pins. then scrunch a little more.)
    7. Then spray all of your hair with extra strong hold hair spray. (don't flip hair upside down)
    8. There you go! all done in a matter of 10 minutes.

    Method 4
    1. Take a shower or dampen your hair.
    2. Run gel and mousse through your hair and put in an extremely messy bun.
    3. Pick at hair and curl loose strands with finger and spray with spray gel with finger tips while in messy bun.
    4. Spray massively with hair spray gel.
    5. Go to bed.
    6. When you wake up, spray your hair with gel and run real gel through it too. (No mouse, as it will make your hair flat.)
    7. Take bun out of hair and put poof in with bangs. (optional)
    8. Then you will have a crunchy, scrunched hair.

    Teased Ponytails


    Style 1

    1. Take a bit of hair near the back of your head (about 4 inches wide) use your hand to form a small bump and backcomb it near the bottom several times. Secure it down loosely with a couple bobby pins.
    2. Take another strand of hair from the center of your head (about 5 inches in width), backcomb, and pin it down over the first bump.
    3. Part your bangs to a side of your choice, and hairspray to hold the look.
    4. Finish with a head band or tie your hair up for a sophisticated pony!

    Style 2

    1. Start with your hair parted its usual way.
    2. Take a section of your hair in the front where your hair line is (it needs to be thick but not too thick).
    3. Start to twist it around about 3 times, while bringing it back.
    4. Push barely to the front so that it makes a bump about an inch or 2 high.
    5. Secure with a clip to the top of your head.
    6. Use a curling iron to make your hair bouncy and fun!

    Style 3

    1. Put your hair in a basic ponytail, high or low doesn't matter but a low one would work best with very long hair.
    2. Put elastics down the ponytail every 2-3 inches, or 1 inch if you have short hair. Use small, thin, covered elastics -or rubber bands- that are close to the color of your hair.
    3. Pull the elastics down a little bit and then up again for pretty poof.
    4. Voila! Accessorize with a cute headband or head wrap.

    Hair extension

    If you have short hairstyle, and want to have long updo for this coming prom night. This will probably is the mission impossible. But having say that, there is always alternate choice for you.

    If you happen to stay in New York, then getting hair extension is not a difficult task for you. You can visit the nearest hair stylist to get the work done on your short hair. How tacky it looks when your hairs are short as well as damaged and you have to go for a social gathering? In a moment of haste, you will wear either wigs or just shrink yourself from the party. Hair extension has come as a boon for such people like you, who do not want to waste time in growing the hairs naturally that takes more than years. This is a new development in cosmetology that has been liked by everyone.

    Long hairs that are cut in a beautiful style would look fabulous on prom night of course. It is according to the face cut that the style is given to an individual. Now, if you are bored enough of keeping your hairs short, then hair extension would surely be beneficial for you. In the present world that is moving fast enough, no one has that much time or patience for letting the hairs grow like that. Hair extension is generally attached to the track of natural hairs, so that nothing goes wrong. Moreover, this hair extension has to be made from human hairs so that they should not look awkward.

    Be it in New York or any other state, hair stylists recommend the use of hair extension for such people who either want to grow their hair or correct the damaged ones. Well, there are numerous hair stylists who make use of different ways of attaching these extensions to the human hairs. Some use glues or bonds, while others use copper coils that merge naturally with the hairs. These extensions are attached to the last layer of hairs, so that they are not at all visible to other people. With hair extension, only you would know that something is being worn

    If you have short hairstyle, and want to have long updo for this coming prom night. This will probably is the mission impossible. But having say that, there is always alternate choice for you.

    If you happen to stay in New York, then getting hair extension is not a difficult task for you. You can visit the nearest hair stylist to get the work done on your short hair. How tacky it looks when your hairs are short as well as damaged and you have to go for a social gathering? In a moment of haste, you will wear either wigs or just shrink yourself from the party. Hair extension has come as a boon for such people like you, who do not want to waste time in growing the hairs naturally that takes more than years. This is a new development in cosmetology that has been liked by everyone.
    Hair Extension
    Long hairs that are cut in a beautiful style would look fabulous on prom night of course. It is according to the face cut that the style is given to an individual. Now, if you are bored enough of keeping your hairs short, then hair extension would surely be beneficial for you. In the present world that is moving fast enough, no one has that much time or patience for letting the hairs grow like that. Hair extension is generally attached to the track of natural hairs, so that nothing goes wrong. Moreover, this hair extension has to be made from human hairs so that they should not look awkward.

    Be it in New York or any other state, hair stylists recommend the use of hair extension for such people who either want to grow their hair or correct the damaged ones. Well, there are numerous hair stylists who make use of different ways of attaching these extensions to the human hairs. Some use glues or bonds, while others use copper coils that merge naturally with the hairs. These extensions are attached to the last layer of hairs, so that they are not at all visible to other people. With hair extension, only you would know that something is being worn.
    Prom Hairstyle
    Commonly, hair extension is available in many textures and colors so as to suit every hair type. Now, you need not to worry about the fact whether hair extension would look amazing on you or not. Whenever you visit the hair stylist to get this thing done, he or she would advise you to take proper care of hair extension to maintain their texture and smoothness. Ideally, you have to go to the stylist in every 2 or 3 months, so that the maintenance process can be carried out. Moreover, you have to apply moisturizer to keep the hairs silky. After all, you are spending your hard earned money on this process and care needs to be taken for it.

    How to Do Smoky Eyes


    Our smoky eye instructions are simple and easy to follow and will show you exactly how to create smoky eye makeup in as little as 5 minutes. Blending is of course the key to perfect smoky eye makeup and you will need to ensure that your colors are blended correctly. Another smoky eye makeup tip which is also one the most eye shadow make up tips is to pair light colors with dark colors.

    Step 1:

    The first step to smoky eye makeup is to prepare your eye lid. In order to do this you will need to ensure that your eye shadow does not melt into the crease of your eyelid and to do this you will need to start with an eye shadow bare.

    Step 2:

    Next you will need to apply your eyeliner. If you are aiming for a black, brown, or gray smoky eye makeup, you will need to apply eyeliner in one of those colors just above the upper eyelash line. You will need to make the line thicker in the middle of the eye.

    Step 3:

    To create color on the bottom lashes, which is the key to smoky eye makeup you will need to use a lighter eyeliner. Once applied, you will need to smudge this for your smoky effect.

    Step 4:

    The next step is to apply a light base color to your eyelids. You should apply this over the eyelids to your browbone.

    Step 5:

    Next you will need to blend in a darker color. The color you choose will need to be kept below the crease of the eyelid. Once you have both all this done the next thing you need to do is create your smoky look. You will need a darker eye shadow color for this. Use your eye shadow brush and start blending in the color starting at your lash line and blending upwards. You should make sure to blend the color into the lash line so that the eye liner disappears. Stop the darker color once you reach the crease in your eyelids.

    Step 6:

    The next step is to double check what you have done, and ensure that both eyes match. If you need to blend some more color, this can be done using a Q-tip.

    Step 7:

    Finish your smoky eye makeup look with several coats of mascara.

    By following our step by step smoky eyes guide you will have the perfect smoky eye make up look that will last all day long.

    How apply eye makeup


    The eyes are the windows of the soul, so learn how to apply eye makeup to make the most of what you've got.

    Types of Eye Makeup


    Shadow

    Eye shadow is the coloring that goes on your lids. You can use one to three colors in complimentary shades, depending on how dramatic an effect you want to create.

    Shadows are available in:

    • Powders in compact cases
    • Creams in stick or pencil form
    • Paints in tube form that go on creamy but dry to a powdery texture

    Eye Liner


    Eye liner is used to define the shape of your eyes by drawing a line just outside of your lashes, and is mainly available in two forms:

    • Liquid eye liner, which is applied with a thin brush. This type of liner requires a steady hand to apply without making a mistake.
    • Eye liner pencils, which are a bit easier to use, as you don't have to be quite as accurate. The best technique is to draw your lines and then smudge them just little with your fingertip or makeup brush for a softer, sultry look.

    Tip: You can also use shadow in place of or in combination with your chosen liner. Try adding a very thin line of color just outside of your lower lashes and then draw your liner on. This can really enhance your look.

    Mascara

    Mascara is applied by brush directly to your eye lashes to make them look fuller and longer, additionally completing your eye makeup.

    Mascara is available in two main forms:

    • Liquid mascara comes in a tube with its own brush in the cap. This is by far the most popular type of mascara, and is even available in a waterproof formula, so avoid looking like a raccoon even if you shed a few tears.
    • Powder cake mascara is still available, but it is far less effective than liquid mascara, and is definitely not waterproof.

    Under Eye Concealer

    Though technically more a part of your foundation, the concealer is used to lighten dark circles under the eyes before applying the rest of your makeup. Concealer looks like a tube of white or lighter flesh toned lipstick and is applied the same way, and then blended at the edges.

    How to Apply Eye Makeup

    Now that you know what to use, let's begin learning how to apply eye makeup to create brilliant, beautiful eyes.

    Tuesday, September 21, 2010

    Eye make up


    Every woman needs to know the secrets to applying eye make up. Our step by step applying

    eye make up guide will show you how to apply make up and make the most out of your eyes.

    Your eyes can make you look and feel spectacular but if you don’t know the secrets to applying eye makeup, then you will never be able to take advantage of this.

    Listed below is the steps to applying eye makeup.

    Eye shadow

    Applying eye make up takes practice and when applying eye shadow. there are a few steps you need to follow.

    1. You should always decide in advance how many eye shadow colors you are going to use.
    2. Choose your primary color first. This is the color that you want to stand out the most. You apply this color to the whole of your eyelid.
    3. The next step is to apply the lighter color eye shadow above this color and below your eyebrow. The entire area should be covered in one movement.
    Eyeliner:

    Eyeliner is essential when it comes to applying eye make up and it is available in both liquid and pencil form.

    1. The first step to applying eyeliner is to draw a thin line as close to the base of your eyelids as you possibly can. You should always start at the inside corner of your eye and work your way out.
    2. If you find it difficult to complete this in one line, short strokes can be used.
    3. If you wish to create a dramatic look when you apply eye make up, you can also apply eyeliner to your bottom lids. This is done in the opposite direction to the top eyelids.
    Mascara:

    Mascara is the third process for applying eye make up. In order for your eyelashes to look their best it is worthwhile investing in an eyelash curler.

    1. When applying mascara you should never pump the wand into the container. This pushes air into the container and in turn dries out your mascara. Instead simply insert the wand and turn it a couple of time before pulling it out.
    2. You should only apply mascara by running the brush along your lashes. The direction of this should be away from your face. Only apply 2 coats and allow the mascara to dry in between. This will help to make your eyelashes appear thicker.
    3. After applying your mascara, combing your eyelashes with an eyelash comb will help to remove any clumps that may appear and this will also separate your lashes to give them a fuller thicker look.

    By following these tips for applying eye makeup, you will be well on your way to looking and feeling spectacular.

    EYE MAKEUP


    Here you can 6 steps of eye makeup. I hope it will be helpful for you.

    Nail polish lagna

    Hot tool ka tarika

    siya gardan

    Lambi palkaien

    keel mahasay

    Jhoriyon ka khatama

    Honton ka kalapan

    Hathon ko malayiam karna

    Gandumi rangat ko sufaid karna

    Cheray par badnuma baal

    Cheray ki shadabi

    Cheray ki tazigi

    Cheray ki chahiyan

    Banhwono ko chamakdar

    Ankhono ki hifazat

    Ankhono kay siya halkay

    Hardware


    The physical parts of computer which can be seen or touch are called HARDWARE. For example monitor, CPU, keyboard and mouse are Hardware.

    Software


    The set of instructions given to computer to solve a problem or to control the operation of the computer is called SOFTWARE.
    They cannot to be seen or touch.

    What is computer


    Computer is an electronic device which is used to store and process data or solves different problems according to a set of instructions given to it